One of the most important non-sewing skills you can have as a quilter is to be able to photograph, edit and share photos of your work. You’ll want to do this to share your creations on social media or keep a visual record of your projects. You may also need to do it to enter quilt shows. (NB: Quilt shows may have more stringent rules about photographs of items for entry — always double check the guidelines! Here’s a good general article about photographing for quilt shows: https://www.quilts.com/photographing-your-quilt/)
For this walk-through I’m going to assume you’ll be taking photos with a phone, either an Apple iPhone or a phone running the Android operating system. With the excellent quality of cameras on modern smart phones, there’s really no need to use any other kind of camera for this. Full disclosure: I’m an iPhone user and have never used an Android phone myself, so my suggestions are based on my experience. But most smartphones have similar basic settings.
The most important kind of shot for entering shows or selling your pieces or having as a record of your work is the quilt photography equivalent of a passport photo — straight-on (no artsy angles or odd trapezoids) with every bit of the piece visible and equally lit.
CAMERA PHONE SETTINGS
1. Go into your Phone’s Settings
2. Pick Camera
3. Click on “FORMATS” – Choose most compatible because .jpgs are much easier to share
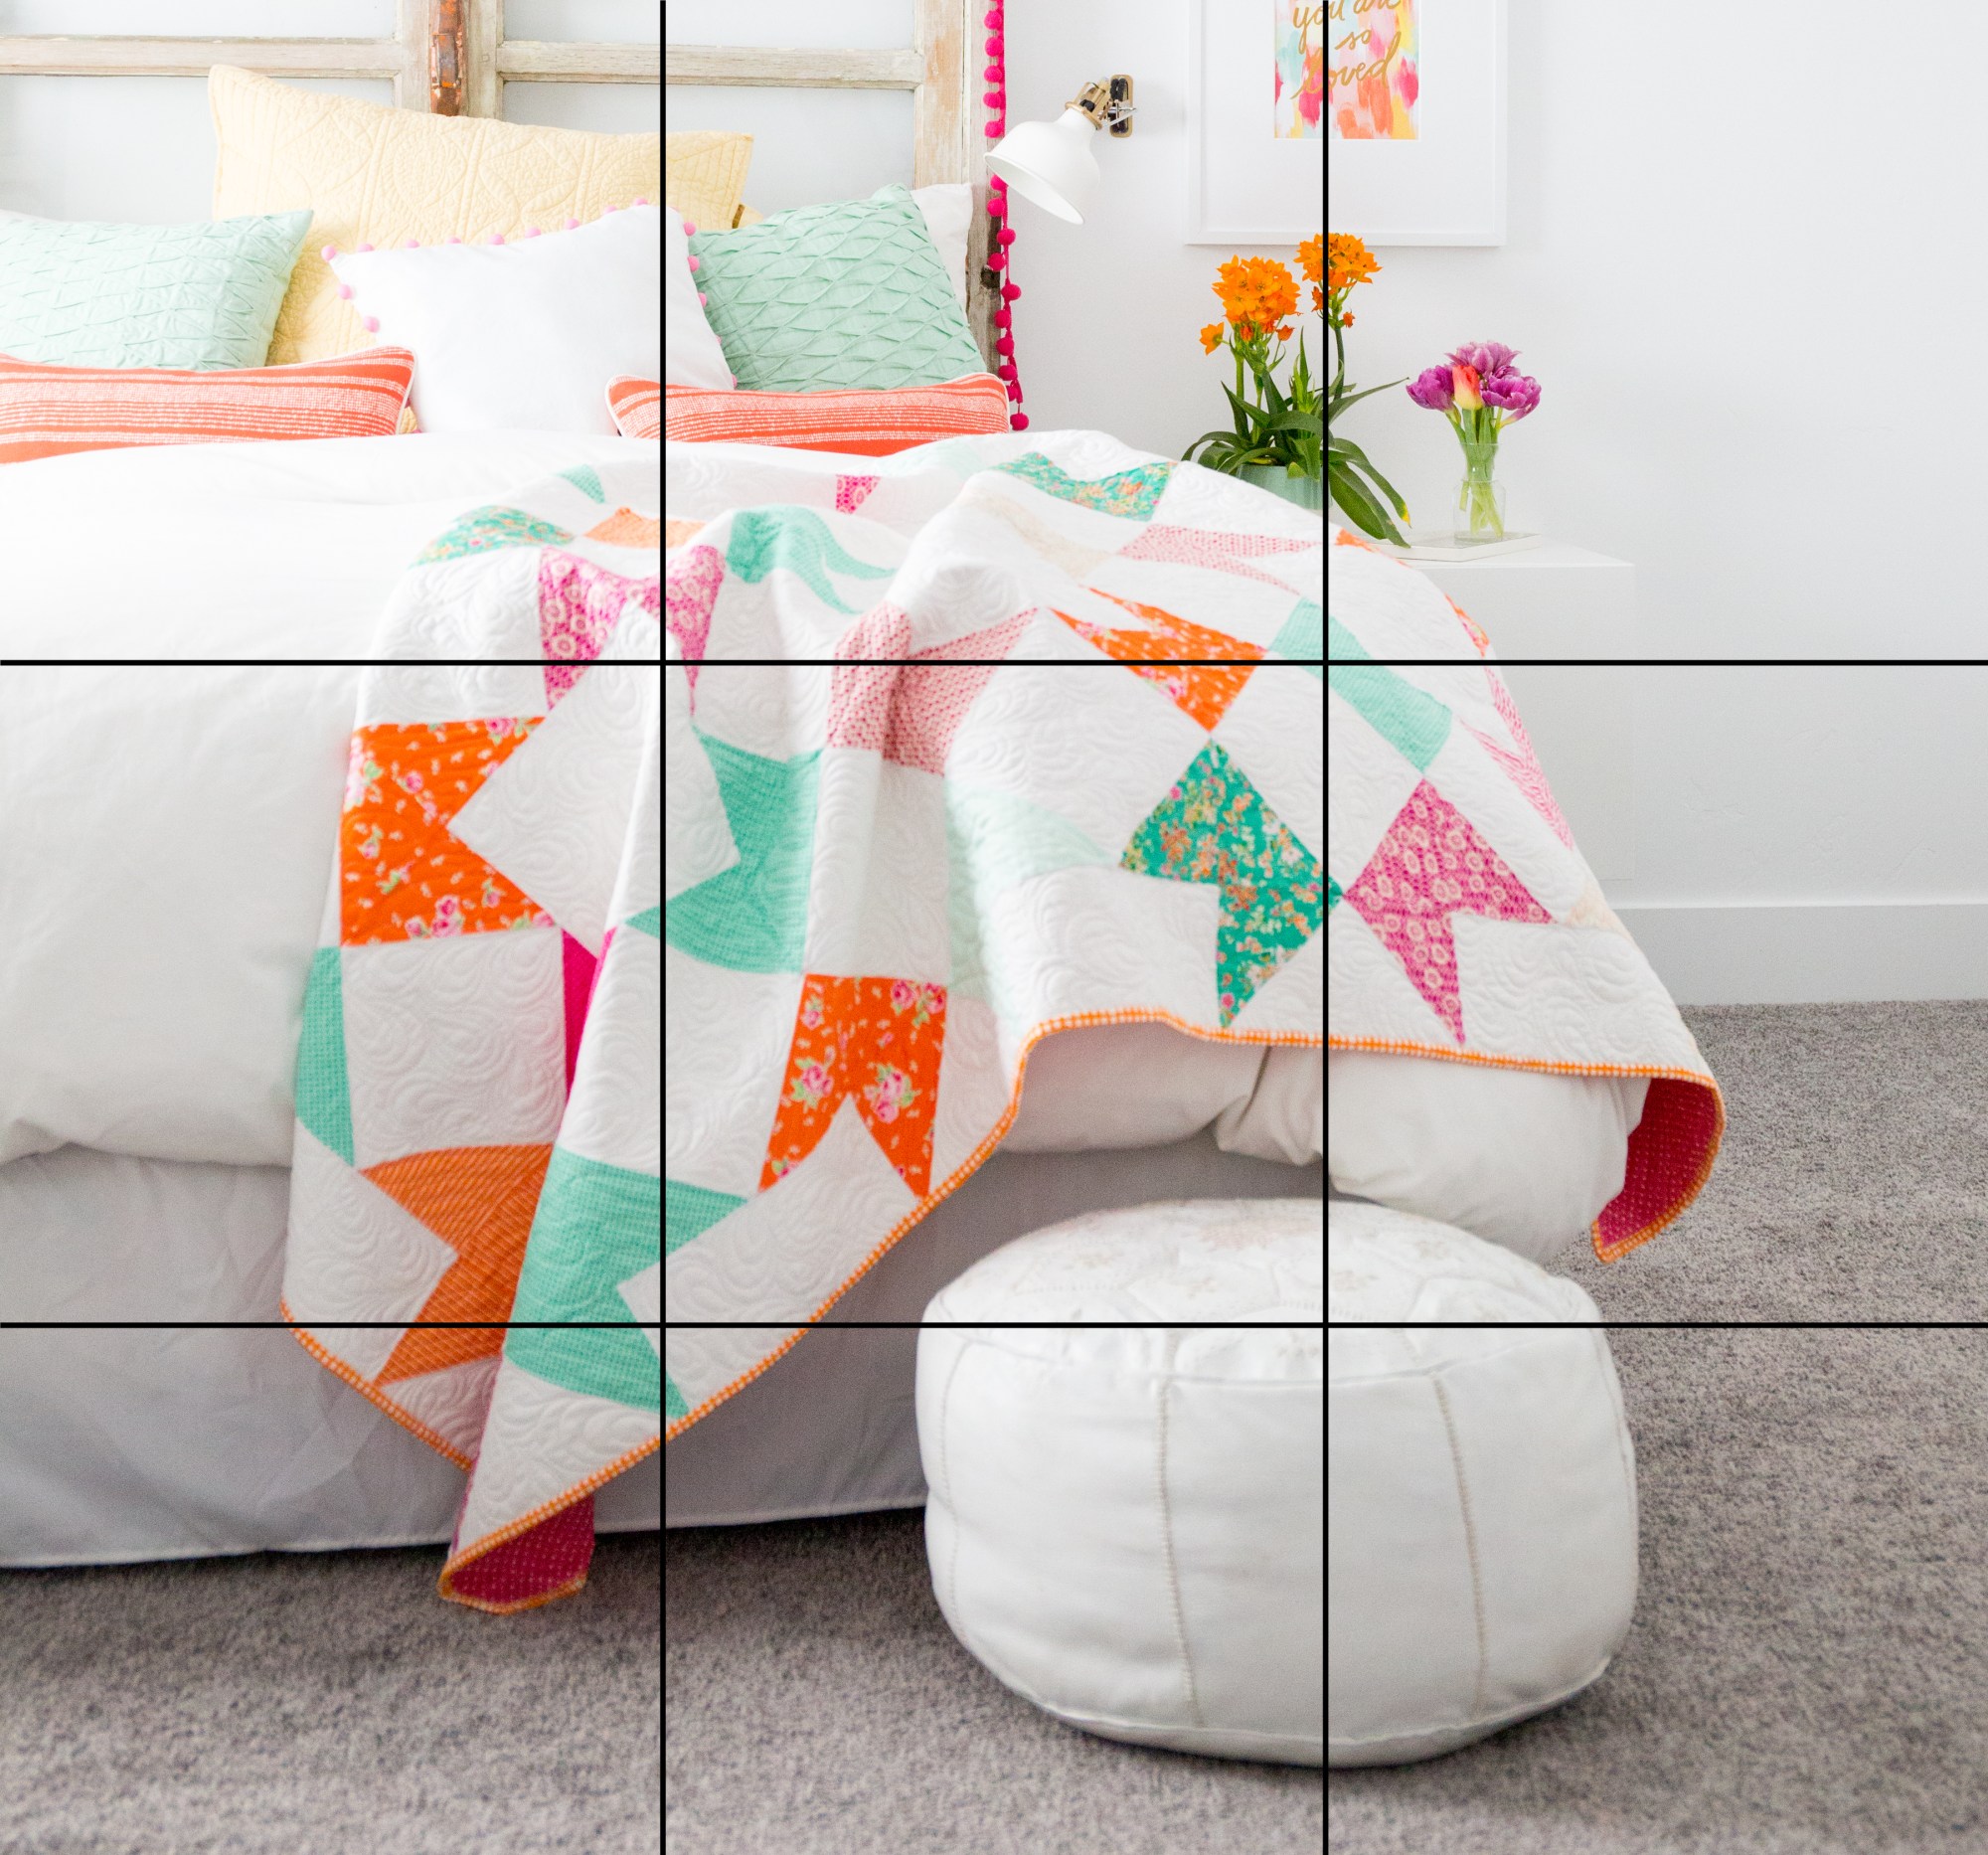
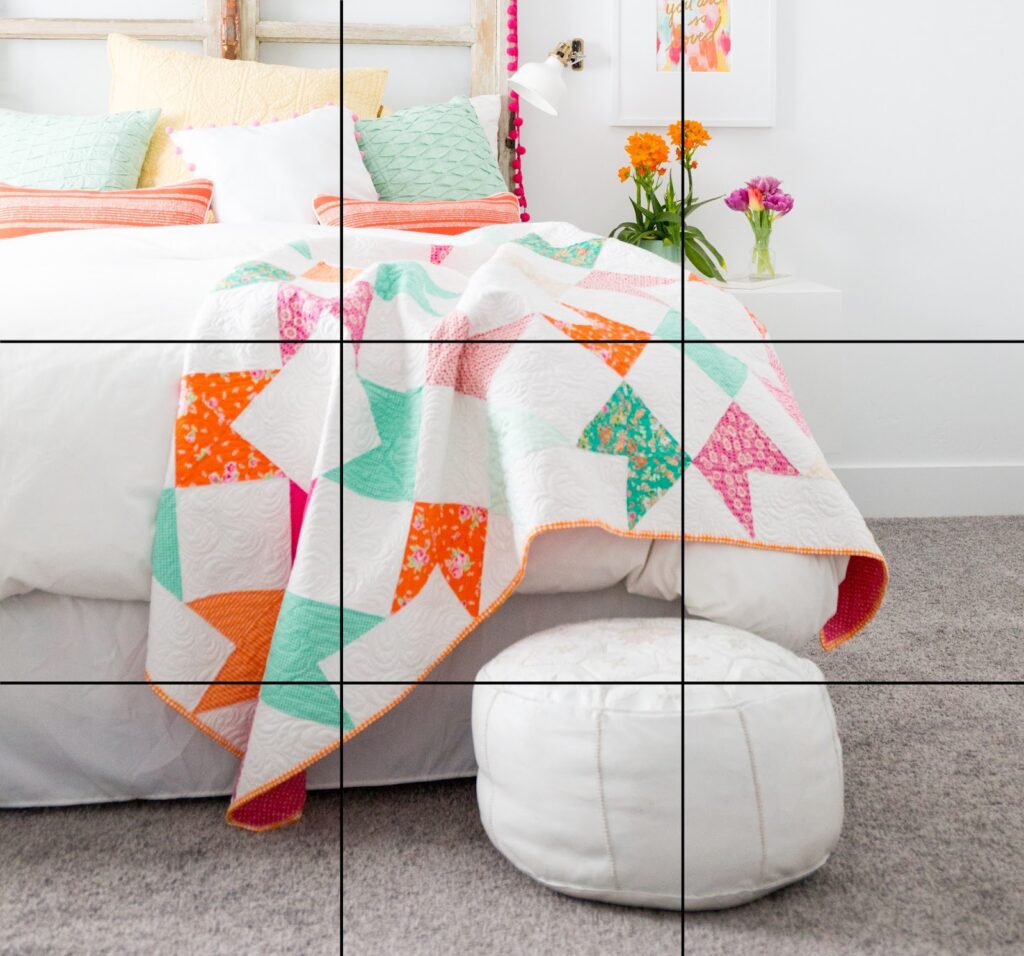
4. Turn on “GRID” (this will give you guide lines that divide your screen into nine segments — this will help you centre everything or arrange an attractive composition. It will also turn on the levelling crosshairs — more on that later)
5. Turn off “Smart HDR” or “HDR”
SET UP YOUR QUILT FOR BEING PHOTOGRAPHED:
Tips for setting up your quilt to be photographed:
HANGING:
Hang the quilt outside — on a railing or from a clothesline. For a casual shot, this is perfect — make sure the light is falling on the quilt, not behind it.
Use a stand: I bought this stand (originally designed for holding a backdrop for photo sessions) and it’s been wonderful for me!
It can be adjusted to up to 8.5’ high and from 5 to 10’ wide. You can set this up on your driveway or patio with natural light and get a great shot! When I’m not using it as a stand, I use the uprights as light stands (see below).
PIN IT TO YOUR DESIGN WALL:
Use T pins or similar pins to pin the quilt securely to the design wall. Pinning it all around will make sure it’s nice and flat. (Note about design wall colours: For serious quilt show entries or competitions, you’ll have to take your shot against a neutral background — grey or white is always good, and a neutral mid-grey is best.)
LAY IT FLAT:
Smaller projects can be laid on a table or even the floor, or a bed. You’ll need to be well above it and centred to take a good photo, so consider standing on a chair if you need to!
STAGE THE QUILT INSTEAD OF HANGING IT
You can also photograph your pieces for social media or as extra shots in a more relaxed or natural way. Set the table with your quilted placemats. Fold the quilt and put it on a rack or ladder, or over the back of a chair.
LIGHTING:
Lighting is everything for photography. Best of all is natural light with no flash.
NATURAL LIGHTING – OUTDOORS:
Outdoors with the light falling on the object, not behind it. Slightly overcast is best — the clouds naturally diffuse the light. Best time of day is early morning or late afternoon.
Full sunlight can be too harsh and wash out your colours. Dappled light can really detract from the quilt, too.
NATURAL LIGHTING INDOORS:
Pick a room with great lighting — lots of windows. You can even open a door to increase your natural lighting.
STUDIO LIGHTING:
My own setup is to pin the quilt on my design wall and use several studio lights plus the natural light of the room to get the most even lighting coverage I can. If you don’t have a design wall and want to photograph indoors, use any wall, especially one that offers a neutral background and is in an area that gets quite a lot of natural light.
My studio lights are just the 2 adjustable tripod uprights from my backdrop stand (see above) each with a 8.5” clamp light fixture and a 150 watt daylight bulb. The clamp fixtures are easily available at any hardware store and I just clamp them on to the top of the tripod uprights and move them around. I arrange the two lights, one on each side of the quilt hanging on the wall, far enough away to keep the light coverage more even and avoid hot spots.
PRO TIP: You’ll get best results from artificial lighting if you make some homemade diffusers from white greaseproof baking parchment paper (it’s heat resistant!), thin white plastic tablecloths, evenly frosted plastic shower curtain, Lots of light will make it through the diffuser — don’t worry! But it will help give you lovely, even, diffuse light. If you’re using LED bulbs you don’t even have to worry about the heat — just clothespin something over your light and get going! Even with incandescent bulbs, using a diffuser for a short time is quite safe, especially if it’s greaseproof baking paper. Make sure not to clamp anything tightly around the fixture.
TAKING THE PHOTO:
Some basic tips:
- Don’t use flash
- Don’t use the digital zoom — you’ll end up degrading the image. Get closer.
- On the other hand, don’t get too close to the quilt with your phone camera (which tends to have a wide angle lens) — it may distort the image.
- While smartphones are great at stabilization to reduce camera shake, you can use a tripod and a smartphone holder for even better results.
- If you are unable to secure a tripod try this: frame the art work with your smart phone, inhale and then exhale fully, hold your smartphone steady and make the image. With practice you will get sharp images every time!
If you need a clear photo of the entire quilt, you ideally want the lens of the camera to be aligned with the centre of the quilt. This keeps the subject of the photo un-distorted. The grid in your viewfinder will help with this, too. This means you may need to crouch down or get on a ladder or chair so that you are aligned with the centre of the quilt in both directions.
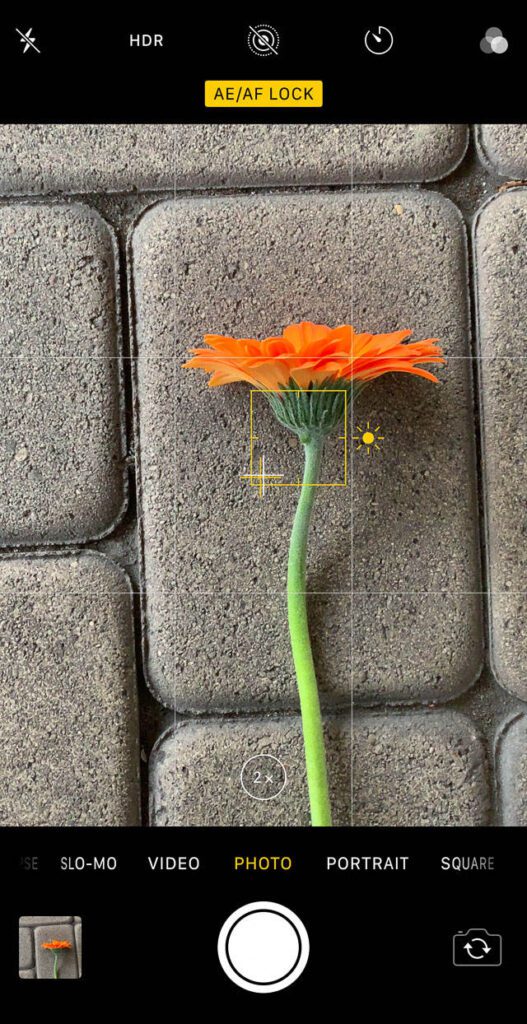
If your subject is lying flat, and you’re using an iPhone or Google Camera, there’s a great aid for you. Once you’ve turned on the grid you’ll be able to use the levelling cross hairs. A pair of crosshairs (+) will appear, one fixed and one floating. Try to hold your phone as straight down as possible to make the two crosshairs appear and line them up,
EDITING YOUR PHOTOS:
You can do basic edits in your phone (rotate, etc). Check out these links for specific tips:
How to take and edit photos on an iPhone: https://support.apple.com/en-ca/guide/iphone/iphb08064d57/ios
How to take and edit photos on an Android Phone:
https://support.google.com/photos/answer/6128850?hl=en&co=GENIE.Platform%3DAndroid
MAKING A LARGE PHOTO FILE SMALLER:
Depending on the settings on your phone, you’ll probably be taking photos that will be saved as .jpg files. The file size of jpg images encompasses two things: the actual size of the image (measured in pixels – the smallest units of the image) and the amount of compression (often expressed as a percentage of the uncompressed image).
When editing photos to reduce size, you’ll see options like “reduce quality”, “make smaller”, “reduce resolution”. Photos for the web are usually saved at a resolution of 77 pixels per inch but photos for printing need to be at 300 ppi. You’ll need maximum resolution photos for big quilt shows — you don’t have to worry about this for social media sharing.)
You can download photos from your phone to your laptop and edit them with a photo editor.
Photo Editors for the Mac: Preview for the Mac comes pre-installed and it’s remarkably useful. You can crop, change the size and compression of the file, correct colours, rename the file — whatever you might need. You can change the file size if you export the file — Under File menu choose “Export” and then choose the file type JPG and you’ll be offered a slider to pick the quality of the image. Reducing the quality reduces the file size!
Other image editors include GIMP and the built-in Photos editor.
https://improvephotography.com/53771/photo-editors-on-the-mac-the-built-in-editor-vs-five-free-options/
Microsoft Photos is the built in photo editor with Windows 10 and will do all of the above tasks. A free download for Windows machines is GIMP — an excellent open source photo editor.
https://www.blog.motifphotos.com/how-to-reduce-the-file-size-of-a-photo/
REDUCING FILE SIZE RIGHT ON IPHONE
While there are many things one can do with photos right on the iPhone, it’s frustratingly difficult to do two things that quilters often have to do with their quilt photos: rename the files and make the files smaller (compress them)
Download Compress Photos from the App Store (free)
– launch it
– allow it access to your photos
- Select photos to compress
CHOOSE PHOTOS - Next
- CHOOSE COMPRESSION SETTINGS
- COMPRESS
- It may show you an ad. Just click CLOSE
- It will compress the photo and add it to your photo library in a new album called Compressed Photos.. It’ll show you how much you compressed the file. (you can choose to delete the original or keep 1 original — I’d keep the original)
https://sassafras-lane.com/blogs/news/how-to-photograph-quilts
Holly Knott has a whole mini-site on photographing textile art: https://www.hollyknott.com/stq/index.htm